

Introduction
Easy mehndi design step by step for beginners is exactly what every new mehndi lover needs before picking up a cone for the first time. Learning mehndi does not have to be scary or difficult — with the right steps, the right designs, and a little patience, anyone can create a beautiful mehndi pattern at home.
Whether you are 10 years old or 40, a complete beginner or someone who has tried mehndi before but was never happy with the results — this complete guide is made just for you.
What Makes a Mehndi Design Beginner-Friendly?
A beginner-friendly easy mehndi design step by step for beginners uses simple shapes, short lines, and basic motifs that are easy to control with a mehndi cone. It does not require professional training, expensive tools, or years of practice — just a steady hand, some patience, and the willingness to try.
What You Need Before You Start
- Mehndi Cone: Buy a ready-made cone from any local store or online. Choose one that says “natural” or “organic” for the safest and darkest color result.
- Clean Dry Hands: Wash your hands with soap, dry them fully, and do not apply any lotion or oil before mehndi. This helps the henna stick properly.
- Paper for Practice: Always practice your design on paper first before applying it to your hand. This builds confidence and helps you control the cone pressure.
- Lemon and Sugar: Mix lemon juice and sugar in equal parts. You will need this to dab on the dried mehndi to make the color darker.
- Coconut or Mustard Oil: Keep this ready for after the mehndi is removed — applying oil helps deepen the color beautifully.
Most Important Beginner Tip: Cone Control
The most important skill in mehndi is controlling how much paste comes out of the cone. Hold the cone like a pen, apply very light pressure, and practice drawing straight lines, dots, and circles on paper before touching your hand. This one habit will make a huge difference in how your design looks.
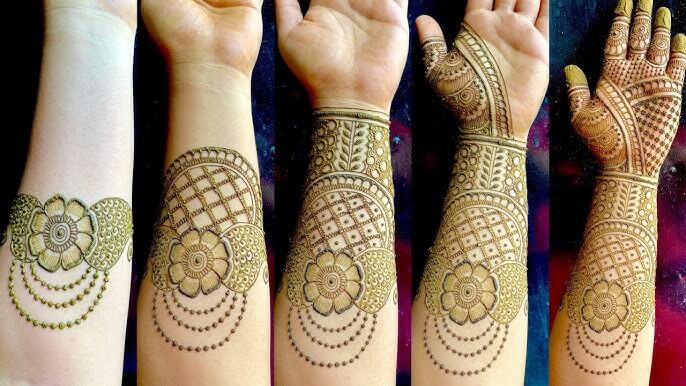
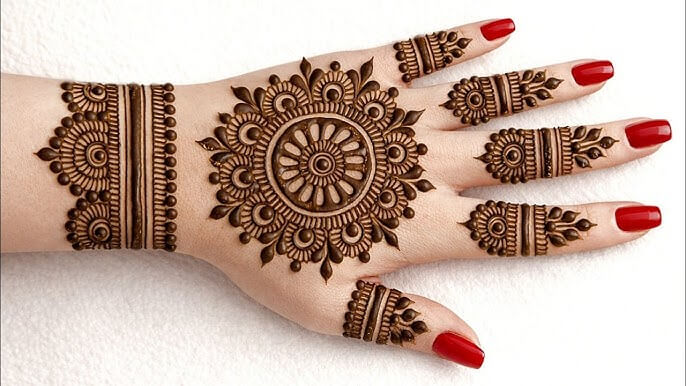
8 Easiest Step-by-Step Mehndi Designs for Beginners
Design 1: Simple Dot and Circle Pattern (10 Minutes)
- Step 1: Draw a medium-sized circle in the center of your back hand.
- Step 2: Place small dots all around the outside edge of the circle, spacing them evenly.
- Step 3: Draw 6 to 8 small petals around the circle using short curved lines to make it look like a flower.
- Step 4: Add small dots between each petal for decoration.
- Step 5: Draw a thin ring of small dots around your wrist to complete the look.
Design 2: Simple Flower Back Hand Mehndi (15 Minutes)
- Step 1: Draw a small circle in the exact center of your back hand — this is the flower’s center.
- Step 2: Draw 8 petals coming outward from the circle, making each petal a slightly curved oval shape.
- Step 3: Fill the center circle with small dots or a spiral line.
- Step 4: Draw small leaves between the petals using two curved lines meeting at a point.
- Step 5: Add a thin vine line going from the flower down toward your wrist with 2 or 3 small leaves on each side.
Design 3: Easy Wrist Bracelet Mehndi (10 Minutes)
- Step 1: Draw a thin line going all the way around your wrist.
- Step 2: Place a small flower or star motif at the center top of the line.
- Step 3: Draw small leaves or S-shaped curves alternating above and below the line on both sides.
- Step 4: Add small dots above and below the entire bracelet line for a finished polished look.
Design 4: Simple Leaf Vine Mehndi (15 Minutes)
- Step 1: Start at your wrist and draw a thin curved line going up toward your middle finger — this is the main vine.
- Step 2: Draw small oval leaves on both sides of the vine, alternating left and right as you go up.
- Step 3: Add a tiny curved line inside each leaf to make it look like a real leaf with a vein.
- Step 4: Finish with a small flower or swirl at the top near your fingertip.
- Step 5: Add small dots along both sides of the entire vine for extra decoration.
Design 5: Simple Heart Mehndi Design (10 Minutes)
- Step 1: Draw a medium heart shape in the center of your back hand or palm.
- Step 2: Draw small dots all around the outside edge of the heart.
- Step 3: Add small leaves or petals coming outward from the dotted border.
- Step 4: Write a small initial or draw a tiny star inside the heart for a personal touch.
- Step 5: Draw a simple chain of small loops from the heart going toward the wrist.
Design 6: Easy Peacock Feather Mehndi (20 Minutes)
- Step 1: Draw a long oval shape in the center of your hand — this is the eye of the feather.
- Step 2: Draw a long curved line going downward from the oval toward your wrist — this is the feather shaft.
- Step 3: Draw small curved lines branching out from both sides of the shaft like feather barbs.
- Step 4: Add small dots at the tips of each barb.
- Step 5: Fill the oval eye with a small swirl or dot pattern and add small leaf shapes around its border.
Design 7: Simple Mandala Back Hand Mehndi (25 Minutes)
- Step 1: Draw a small dot exactly in the center of your back hand.
- Step 2: Draw a small circle around the dot.
- Step 3: Draw 8 small petals around the circle equally spaced like a flower.
- Step 4: Draw a larger circle around the petals.
- Step 5: Draw 8 more petals around this larger circle, placing each one between the spaces of the first petals.
- Step 6: Add small dots between each outer petal and draw a final dotted ring around the whole mandala.
Design 8: Easy Arabic Single-Stroke Mehndi (15 Minutes)
- Step 1: Start at the base of your index finger and draw a large bold leaf shape going diagonally across your back hand toward the wrist.
- Step 2: Draw a second large leaf going in the opposite direction, crossing the first one.
- Step 3: Add 3 to 4 smaller leaves branching off from each main leaf.
- Step 4: Add small dots at the tip of every leaf.
- Step 5: Draw a simple chain or dotted border near the wrist to frame the design.
Common Beginner Mistakes and How to Avoid Them
- Too Much Pressure: Pressing too hard makes thick uneven lines. Practice very light pressure on paper first.
- Not Practicing First: Jumping straight to your hand without paper practice almost always leads to shaky lines. Always practice at least 3 times on paper first.
- Rushing the Design: Going too fast causes lines to wobble. Slow down, breathe, and take your time with every stroke.
- Washing Too Soon: Washing the mehndi off with water instead of scraping gives very faint color. Always scrape the dry paste off first, then avoid water for 12 hours.
- Using Old Mehndi: Old or expired mehndi gives a very light orange color. Always check the date on the cone and use fresh mehndi.
How to Make Mehndi Color Darker as a Beginner
- Use fresh organic henna — the fresher the henna, the darker the color.
- Add a few drops of eucalyptus or tea tree oil to the mehndi paste before applying.
- Keep the paste on as long as possible — ideally overnight for the darkest results.
- Sit near a warm area to help the henna dye penetrate deeper into the skin.
- Never wash with water immediately after removal — this stops color development completely.
FAQs
1. How long does it take to learn mehndi as a beginner?
With regular daily practice of 15 to 20 minutes, most beginners can draw clean and beautiful simple designs within 2 to 4 weeks. Starting with dots, lines, and circles and gradually moving to flowers and vines is the fastest and most effective way to build skill.
2. What is the easiest mehndi design for an absolute beginner?
The dot and circle pattern is the absolute easiest mehndi design for complete beginners — it only uses two basic shapes and can be done in under 10 minutes with a result that still looks beautiful and neat.
3. Can I do mehndi on my right hand by myself?
Yes, with practice! Start by practicing with your non-dominant hand first to develop cone control, then move to the other hand. Simple designs with basic shapes work best for self-application.
4. How do I fix mistakes in mehndi as a beginner?
Use a wet cotton swab or toothpick immediately to gently remove fresh mehndi paste from the wrong area before it dries. Once it dries and stains the skin it cannot be removed easily — so working slowly and carefully is always the best approach.
5. How long should I leave mehndi on for the darkest color as a beginner?
Leave the mehndi paste on for a minimum of 4 hours — but for the very best and darkest color, leave it on overnight (6 to 8 hours). The longer it stays, the deeper the stain will be.